Web Development Company

We Develope Websites for Small & Medium Enterprises in and outside Trivandrum. For more details Contact 8606092299

Thursday, November 1, 2012

Top 4 Efficient Methods to Reset Windows 7 Password Instantly

As Windows 7 has occupied a high market share, more and more Windows 7 PC users are bothered by forgot Windows 7 password. Indeed, a forgot administrator password in Windows 7 is never a pleasant thought. Therefore, how to reset Windows 7 password has turned into a universal problem.

Method one : Reset windows 7 admin password with Ophcrack

Time: More than 2 hours
Recommend: ★

Official Website: Ophcrack

Ophcrack is a famous and free Windows password recovery software. The big disadvantage of ophcrack is the large ISO file. The 496Mb file takes a while to download, what is more, can you image how hard to burn such large file to a blank CD? It will enlarge unsuccessful rate. But once you succeed in burning a bootable CD, it will take only minutes to recover your lost Windows password.

Method Two: Reset windows 7 admin password with Offline NT Password & Registry Editor

Time: More than 1 hour for a new user
Recommend: ★★

Official Website: Offline NT Password & Registry Editor

The Offline NT Password & Registry Editor is one of the fastest free Windows password reset tool. It will remove Windows 7 password instead of recovering the Windows password like ophcrack.

The ISO file is only 3 Mb. So there is no problem to download or burn this file.
But what slows down the whole Windows 7 password reset process is the DOS based interface which is inconvenient. Sometimes, I even don’t know what to put in. So if you are a newbie with computer, it might take you a while to reset Windows 7 password with Offline NT Password & Registry Editor.


Method three: Reset windows 7 admin password with Windows Password Unlocker

Time: 5 Minute!
Recommend: ★★★★


As an easy method to recover the forgot Win 7 password, there are only four steps as follow:

Step1: Download Windows Password Unlocker and install it.
Step2: Burn the ISO image file onto a blank CD/DVD.
Step3: Boot up your Windows 7 PC by the bootable burned CD/DVD in minutes.
Step4: Remove the forgot Windows 7 password on the operation interface and logon PC without password.


Posted by : Nishad S S

How to reset your Windows password using Ubuntu


Resetting your Windows password is as easy as resetting your Ubuntu password. What you need is a bootable Ubuntu system (ie. USB, CD or anything) and software called chntpw

Please find the steps o reset your Windows password below.

1. # Boot from your bootable device (Ubuntu Live Session)

Shutdown your computer and boot up using your bootable system. So you run Ubuntu on Live Session that means you run your system without install it!

2. # Set your repository

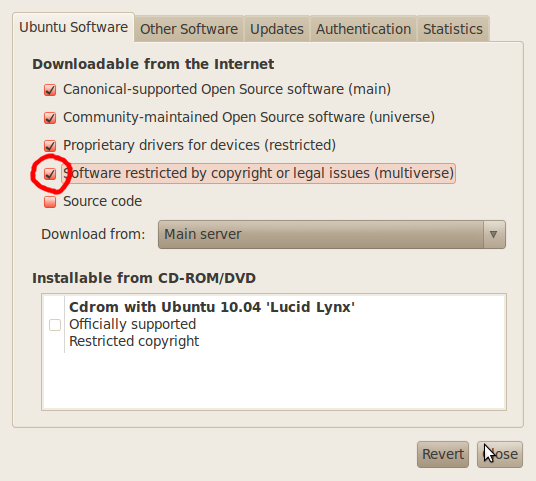
Goto Synaptic Package Manager -> Settings -> Repositories -> Ubuntu Software and check the “Software restricted by copyright or legal issues” checkbox. And don’t forget to reload synaptic.


3. # Install CHNTPW
Install from Synaptic Package Manager or use this command on shell:

sudo apt-get install chntpw
4. # Resetting Windows password
# Mount your “Windows installed” device

It’s depending on your system, example:

sudo mkdir /media/WINDOWS
sudo mount /dev/sda1 /media/WINDOWS
On my system Windows installed on /dev/sda1 and I want to mount it to /media/WINDOWS that I’ve created before.

# Goto your Windows system configuration folder

Located at [WINDOWS_DEVICE]/WINDOWS/system32/config/:

cd /media/WINDOWS/WINDOWS/system32/config/
# Cracking the SAM file

There a SAM file on Windows system configuration folder. That’s the file we’re looking for. Let’s crack it

chntpw SAM
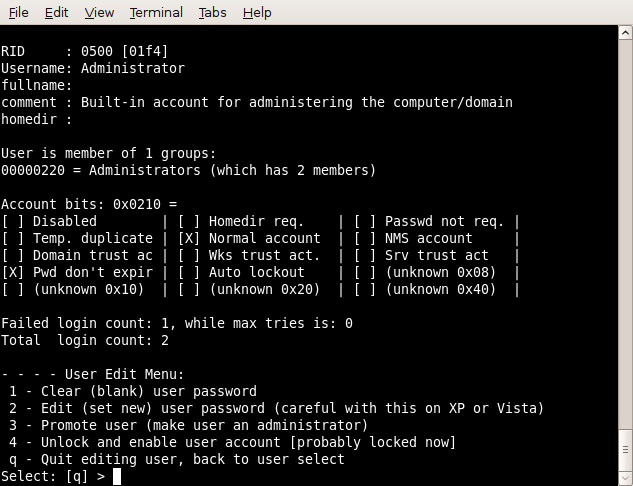
And if you see the output similar with image below, it’s mean you can crack the SAM file.


As you see, there are 5 choices. Just type “1″ and press “ENTER” to reset your password.

Posted by : Nishad S S

My pen drive has the data but not showing


How to Open the Hidden Files in a USB Pen Drive


While in DOS did you do a dir on the drive ? Then CD on those directories and dir to see what sub directories exist ? 
also: 
SAFE MODE WITH COMMAND PROMPT ( well it is not necessary but you should ), goto command prompt and write these commands. 

1. dir/ah ( list all hidden file/dir ) 
2. attrib -h -s -r -a *.* ( will make all of your file/dir visible ) 

go and find all your file/directories using Windows Explorer, copy wherever you want. 


Usually when virus hide files and it also remove folder options it is much difficult to get the files quickly if one is in hurry, although such virus can be removed manually (ReadRemove EXE virus manually) ;
But I’m going to tell the the way in which you can UN-hide all the hidden files by on single command.
To apply this command follow the following steps
go to Start > Run > type cmd
Dos will open type cd.. (two to three time until only drive letter left)
ScreenShot00029 Unhide Files By Single Dos Command
now type the drive letter in which you want to Unhide the files lets suppose in my case its F:
this will open the F: drive
Now type the following command attrib -r -a -s -h *.*
ScreenShot00031 Unhide Files By Single Dos Command
Press enter this command will un-hide all the hidden files in Drive F even its portablememory stick or usual hard disk
Note: This assumes g is the pen drive letter - Unhides all files on g: 

attrib -h -r -s /s /d g:\*.*

Posted by Nishad S S


Sunday, October 21, 2012

iPad – Dot What?


It’s impressive the stuff you can do just by tapping and holding something on your iDevice. Take for example the other day when I was browsing around in Safari and accidentally held the “.com” key on the keyboard.
I got options for .net, .edu, .org, and even .us!
Just tap and hold the “.com” key and you’re good to go!
Give it a try next time you’re browsing – I’m sure it’ll save you some time! Works on other iDevices, too!

--- Nishad S S

Sunday, October 7, 2012

Why not just reinstall from the “D” drive for Vista or Win 7. The “D” drive has a copy of the system as it existed when it came from the factory – doesn’t it?


I did not get any set up disks when I purchased my HP with Win 7 on it a year ago. I was told that the vendors now use the “D” in place of disks.
Why not? It’s probably the easiest way to do it, and the vendors who told you that computer manufacturers are now using a partition, called a “restore partition” on your hard drive to restore now rather than optical discs are correct. Probably the most important reason for this (from the manufacturer’s point of view) is that it costs less to use a restore partition than it does to manufacture optical discs. The reason that it’s good for us as computer users is because we frequently lose our restore discs. I can’t speak for anyone else, but the only way that I’ve really been able to keep track of them is when HP produced a PC that had a storage area for them on the computer case itself.
Here’s how you restore from a restore partition. Be sure to back your computer up before you do this. Odds are that you’ll be able to do what’s called a “non-destructive” restore that will allow you to keep all of your files intact, but it’s always better to be safe than sorry.
You’ll want to check and make sure that your computer includes a restore partition. All HPs and Dells manufactured within about the past five years or so include them, as do most other computers these days. You do this by clicking START and then COMPUTER. What you’re looking for is labeled “restore” or “recovery”.
Next, click START and then enter “recovery” into the search box. Click on RECOVERY MANAGER.
When you run the recovery manager, you’ll see a screen that looks something like the following. This is an HP screen, so if your machine is a different manufacturer, it may look different, but the options should be virtually identical.
If one of the original programs that came with your computer has become corrupt, you use SOFTWARE PROGRAM REINSTALLATION. MICROSOFT SYSTEM RESTORE will close the recovery manager and launch Microsoft’s system restore program to fix broken Windows. The final option here is REALLY the final option. SYSTEM RECOVERY is for when your system has become hopelessly corrupt and you need to start from scratch.
COMPUTER CHECKUP will check your system for errors and problems. If you’re not sure what’s wrong, this might be a good place to start.
RECOVERY MEDIA CREATION is for those who have a hard time leaving the 20th century and are just not comfortable unless they have a disc to lose. All kidding aside, this is a way to create external restore media, which should then be secured somewhere climate and moisture controlled where you won’t lose or forget them, just in case something happens to your recovery partition. In other words, total hard drive failure or destruction. RECOVER REPORT is pretty self-explanatory. I’m not entirely sure why the REMOVE RESTORE PARTITION option exists. If you’re that hard up for hard drive space, it might be time to invest in a larger hard drive.
I hope that this helps!

-----Nishad S S

Just rebuilt from attack. Now on Windows 7. Could you please do step by step to back up entire system to external HD with win 7? I used NTbackup on XP, but not sure how to do on win 7.


Hi all, You all will be glad to hear that backing up your entire system is easier with Windows 7 than it was with NT. Here is a quick rundown of all that you will need to do:
1. First, you need to launch the Windows 7 Backup and Restore utility. You can do that by clicking the Start button and typing ‘backup and restore‘ into the search bar, or by going to the Control Panel, selecting System and Security, and then Backup and Restore.
2. If you have never run a backup before, click the link on the top right that says Set up backup.
3. The next window that opens asks you to choose a location for your system backup, so select your external hard drive from the choices you are given. Just make sure that your external drive is big enough for a full backup. If it isn’t, Windows will warn you before proceeding. Click Next to continue.
You will be glad to hear that backing up your entire system is easier with Windows 7 than it was with NT. Here is a quick rundown of all that you will need to do:
1. First, you need to launch the Windows 7 Backup and Restore utility. You can do that by clicking the Start button and typing ‘backup and restore‘ into the search bar, or by going to the Control Panel, selecting System and Security, and then Backup and Restore.
2. If you have never run a backup before, click the link on the top right that says Set up backup.
3. The next window that opens asks you to choose a location for your system backup, so select your external hard drive from the choices you are given. Just make sure that your external drive is big enough for a full backup. If it isn’t, Windows will warn you before proceeding. Click Next to continue.
Select backup drive

 ------ Nishad S S

What’s the Windows “Registry?”


Basically, the Windows Registry is a database used to store system and program settings.
Here’s what it looks like:

image
So, for an example, let’s say a particular program gives you the option of setting its font. You select a font on its font selection screen and hit OK. When you hit the OK button, *most* kinds of software will make an entry into the registry. Next time you run the program, it retrieves the information you set, in this case the font style.
Yeah, that’s a bit of an over-simplification, so just in case, here’s the Wikipedia entry for those who want to delve a little further.

---- Nishad S S
Widget by : All Blogging Tips
Read more: http://allbloggingtips.com/2012/05/07/another-new-floating-facebook-like-box-widget-for-blogger/#ixzz2TrzlvfnV